Aucun produit
À définir
Livraison
0,00 €
Total


Publié le 25/11/2015
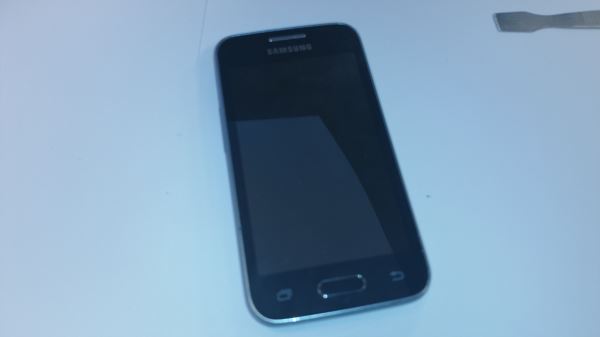
Welcome to this new tutorial for the Samsung Galaxy Trend 2 lite.
By ordering a Trend Galaxy lite we got the wrong model, so you are enjoying this tutorial slightly earlier than with the normal timetable; at the time of writing the parts are not yet available, but they should be very soon!
Before you start:
Some basic tips it does no harm to repeat:
- Before starting, read through this tutorial
- If possible read one or two others for the same brand (Samsung)
- If possible watch some videos
- Find a room with little dust (not one that has just been vacuumed 5 minutes earlier!) and with no drafts (which spread dust).
- After each stage, read the next step in advance to avoid the risk of going too fast or too far.
1- Preparation
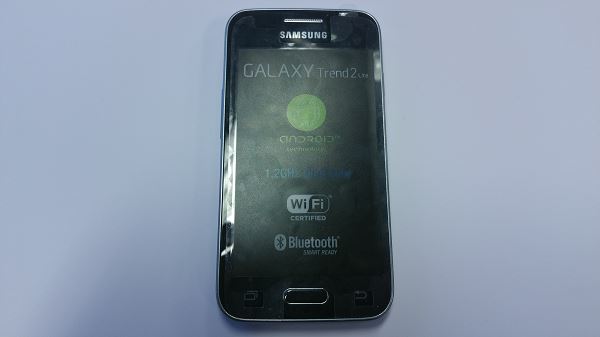
To get ready for carrying out your repairs, you must keep your tools, your phone (carefully check the model by removing the back cover and it should be marked Galaxy Trend 2 lite and G318 or G318h) and your spare part just at hand.
Back up your data (some apps do this for free very effectively), your contacts (for instance on your Google Account) and your photos, etc.
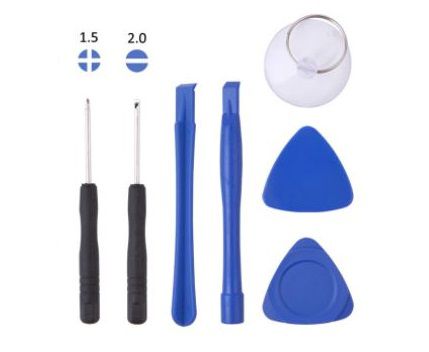
2- The tools:
For this repair you will need a Phillips PH00 (IMPORTANT; for once you cannot use a PH0 or PH000).
You will also need a stiff spatula.
Both tools are available in the shop, singly or as a set.
You will also need to use some kind of heat source, and once more we suggest you buy a heat gun that you can use over and over again (imagine multiplying the number of smartphones and tablets around you by the number of break-downs in a year); and if you cannot afford it, a hairdryer will do (without precise temperature control, it takes longer and is more difficult but it can work) or electric heat gun, but make sure you do not use gas.

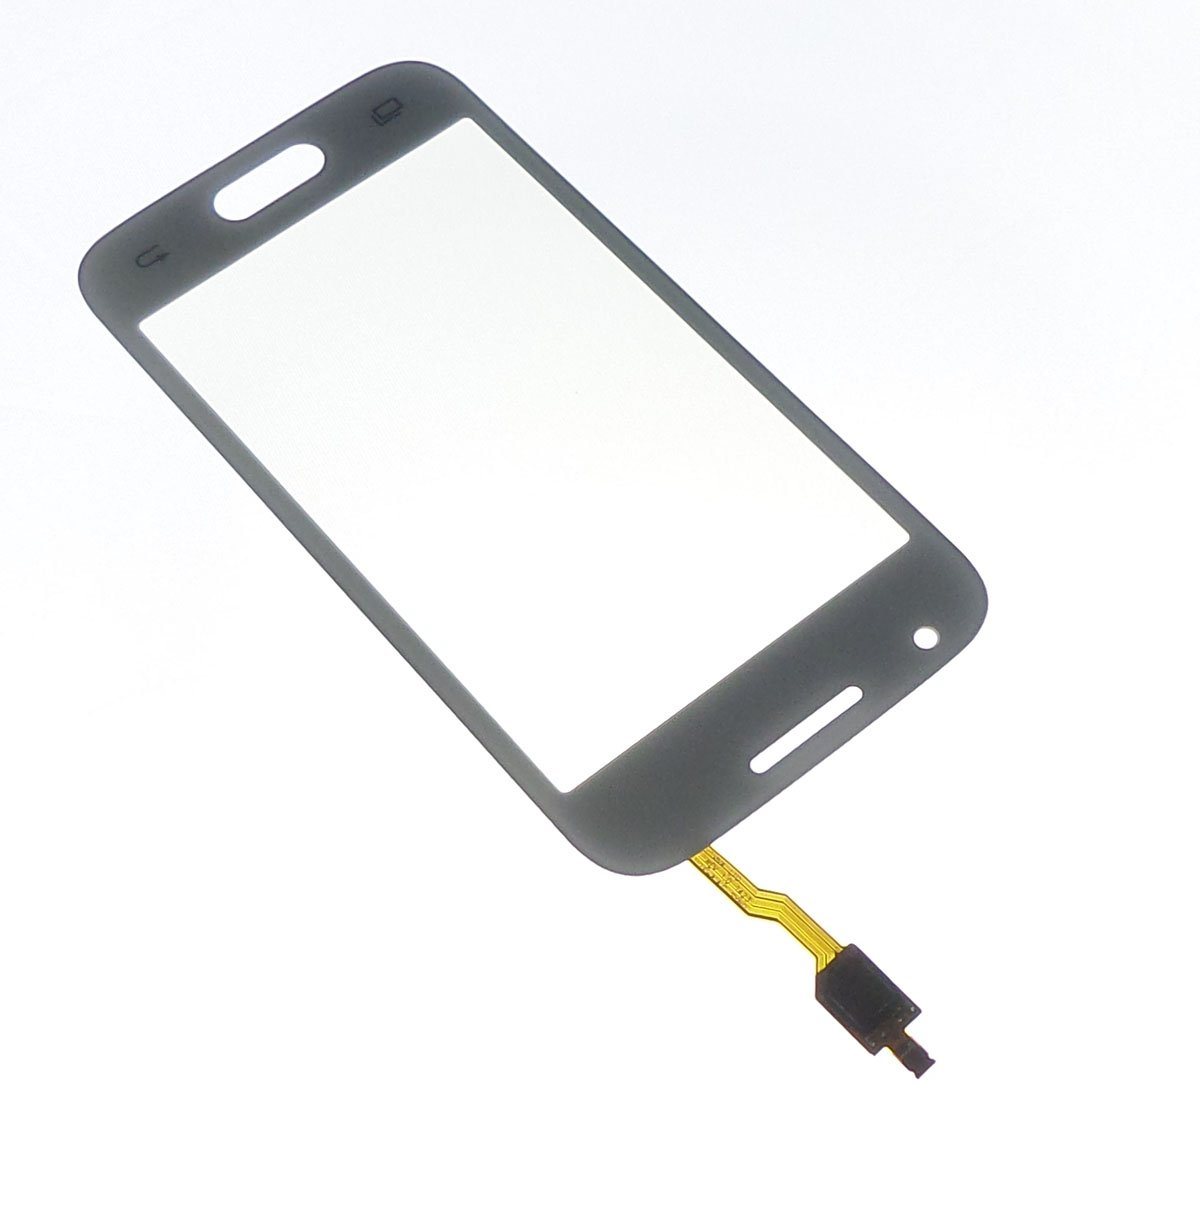
3- Preparations for dismantling the glass of Samsung Galaxy Trend 2 lite.
A bit of history:
From the Trend Galaxy and Galaxy S5 onwards, Samsung clearly intending to make a back chassis joint with the contour frame (the one surrounding the glass). This has resulted in the dismantling (and hence the assembly) of the screens being done from the front; making repairs much more difficult (to go as far as to say that there is a clear intention to render products irreparable, or to make the product repair expenses dearer than the appliance itself, is something we will not do). In fact, to change any small part you are nearly always obliged to dismantle the entire screen, with the associated risk of damage, broken screws (we will deal with that later) and glue to be re-applied...
It is a long time since removing and changing the glass of a Samsung Galaxy Ace could be done off the cuff in 4 minutes!
To sum up, the repair of an entry level smartphone is one of the less easy repairs, especially if you are changing anything other than the glass, as in this case the main risk, which is breaking the glass, is much smaller.
Let's get back to the subject.
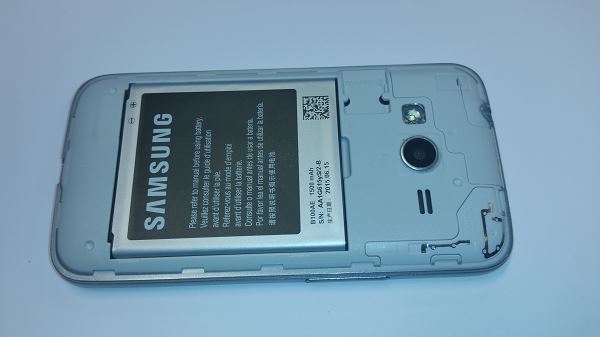
When dismantling any cell phone, always remove the battery or SIM card (here the G318h is a solo and if a duet version comes out, you can also use this guide, the same tools and also the same part, as only the painted wording is different between duets and solos at entry level with Samsung), but also the one or more SD Cards.
If you must keep the glass, protect it with flexible protective film, and failing that with cling film for cooking. If the glass is broken in pieces, this is another reason with the same result; protecting it with film will protect you from cuts and from getting shards of broken glass everywhere. The conclusion is always the same about this subject; the glass might always be tempered at the cost of a few more centimes, and it is difficult to understand why only the top of the range has tempered glass at the moment (not to be confused with annealed glass or mixed substrates like Gorilla glass from Corning).

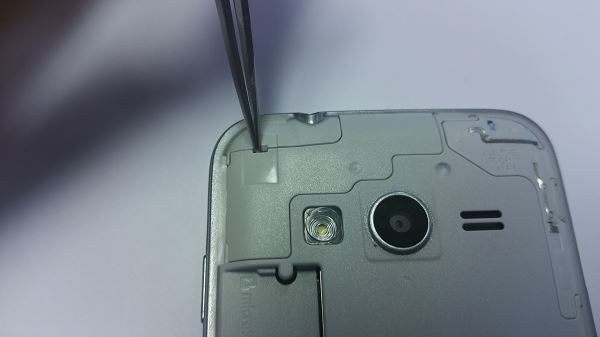
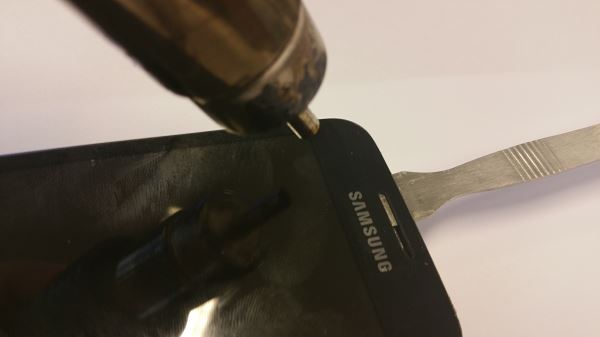
Once the battery and SIM and SD cards have been removed, you need something quite sharp, such as a flat screwdriver or a pair of pliers to lift the left side of this cover.
Once the first section has been raised, do not try to pull it but use the spatula as a lever to release the entire cover. This plastic is quite soft and brittle and if you pull at it you may mark it or even break it.
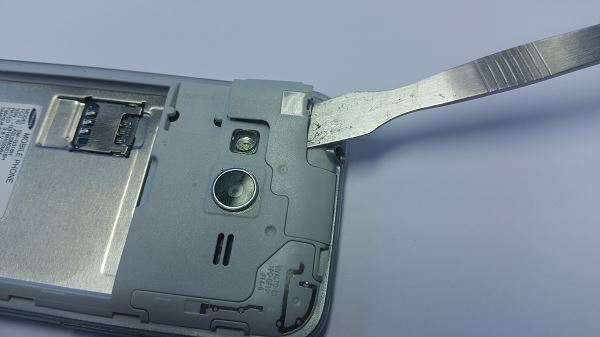
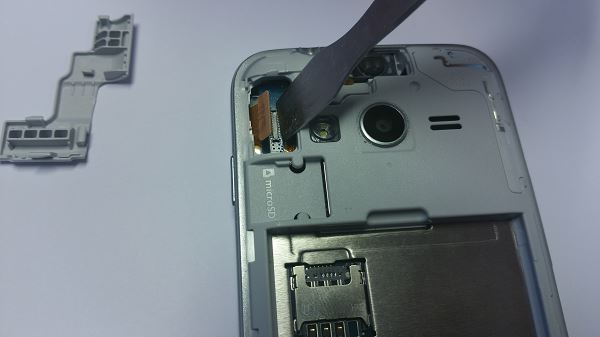
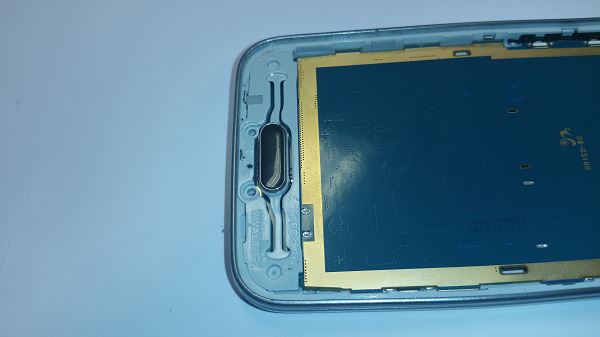
As the phone is put together from the front, the screen is placed at the rear. In order for it to be plugged into the motherboard, Samsung created an access at the back of the phone to connect the screen of the Galaxy Trend lite 2 after assembly. Now we do the opposite, by unplugging the screen beforehand with our spatula. You can see that there is a second cover which is for removing the earspeaker if necessary; however it is necessary to disassemble the motherboard beforehand, and it is not necessary to reach it to dismantle the rest, so we therefore will not touch it.
4- Removing the screen of the Samsung Galaxy Trend Lite 2
The first stage is unconventional and it will help you with the second. It is obvious that Samsung does not recommend doing so, but it seemed to us the best way to proceed.
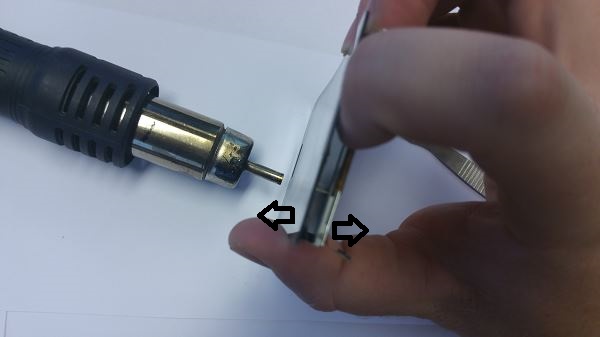
Using your fingers, release some clips (2 or 3) on the side as follows:
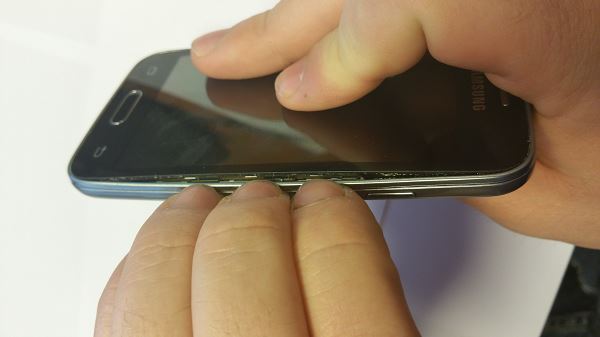
Do the same on the other side:
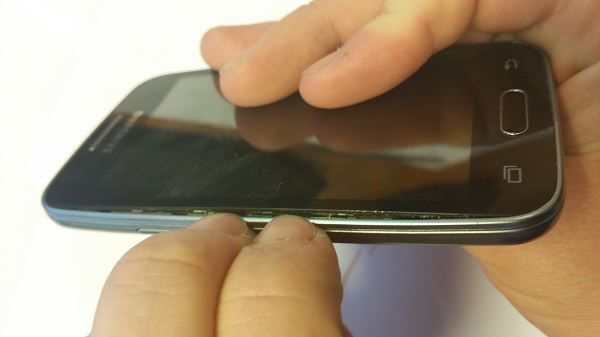
This will have the effect of pressurizing the top and bottom of the glass.
Set your heat source to 170 °.
Heat the upper part of the glass for quite a while.
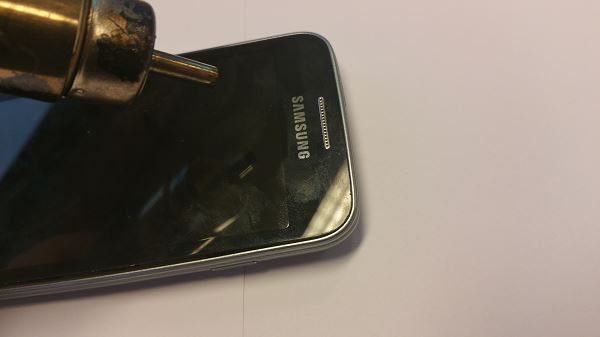
After about a minute you will see the glass gradually come away by itself along the top as a result of the previously applied pressure and the heat which will soften the glue.
Finish off detaching the glass with your spatula.
Do not hesitate to heat regularly, for example after 20 sec (in this way it takes quite a long time, but it is safer).
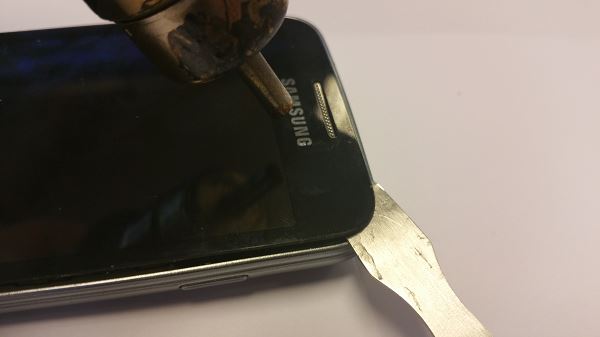
Continue along the glass that is really well glued.
Heat again one last time ...
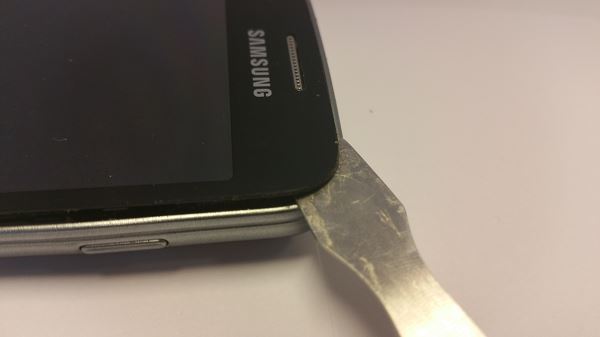
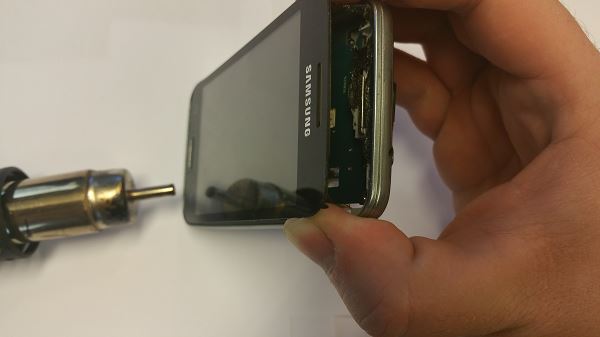
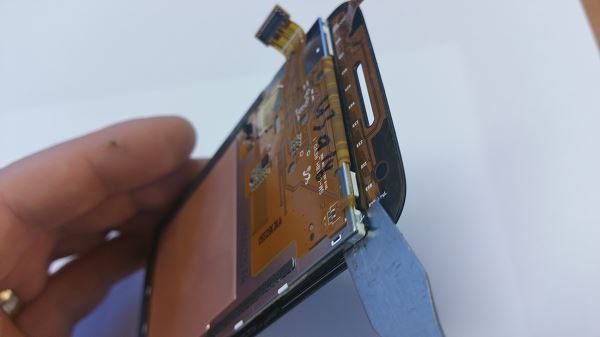
Now the top end of the glass should be easy to raise a few centimetres. Do as in this illustration, and keep it open so you can still do a torque on the lower part which you are going to heat at the same time; for the moment do not press too hard, this is just to lift the glass and do not lift it yet (you will find it is difficult to do at 170 ° and above, as you may damage the plastic).
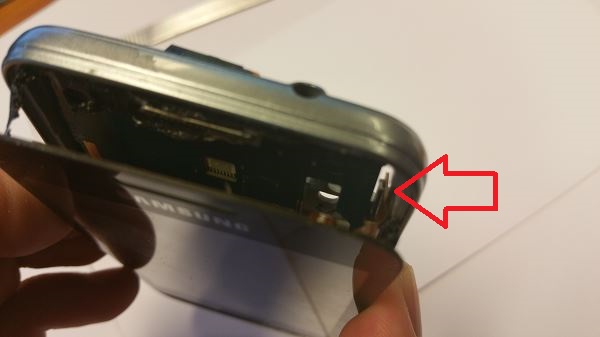
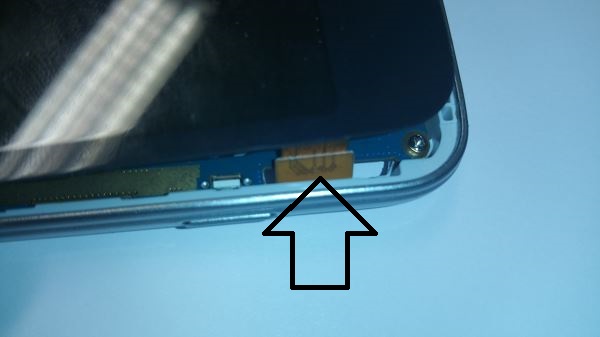
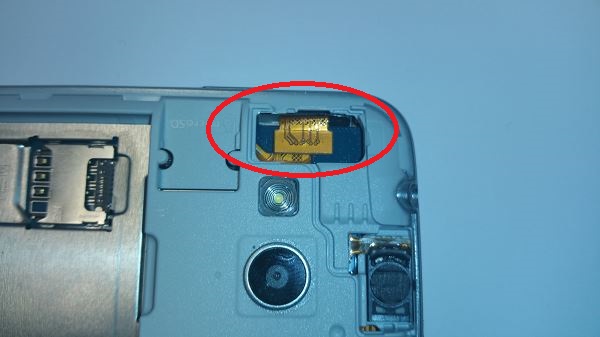
We take the opportunity to draw your attention to the notorious back plug which we disconnected during the first section; we observe that this operation avoids getting a nasty surprise during dismantling. And also make sure that it can pass without snagging.
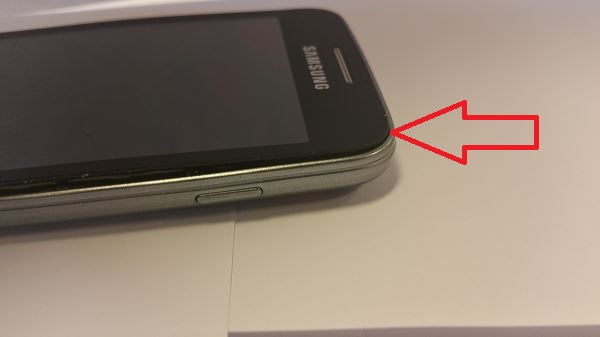
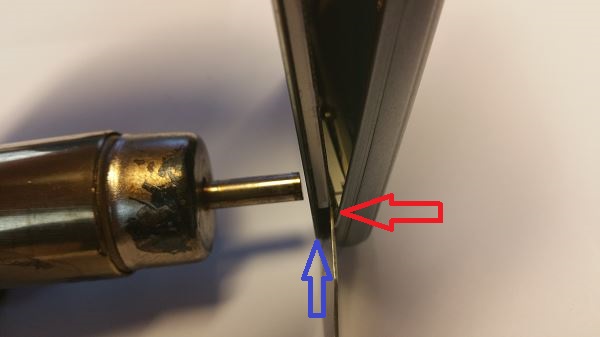
On the lower part, you can see firstly the glass and the black and grey part of the LCD screen to the left of the spatula shaft; blue arrow. There is also a grey-white part to the right; red arrow. The spatula has to pass between the two at this point exactly:
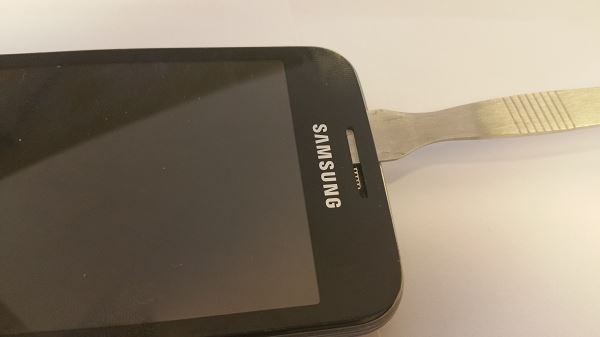
This operation should allow you to finish raising the glass without too much difficulty.
We take this opportunity to suggest you clean the leftover black glue; this is necessary for reinsertion so the new glue does not get too thick or gaps in the old glue do not cause air leaks which let dust into your cell phone.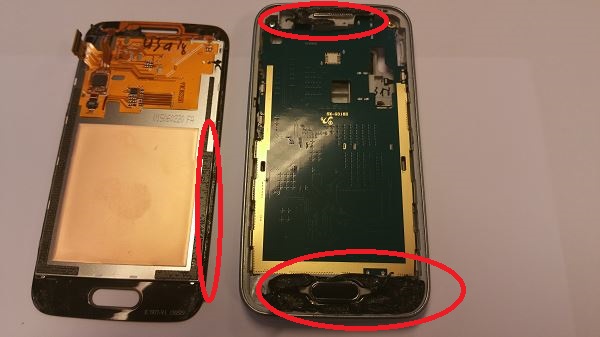
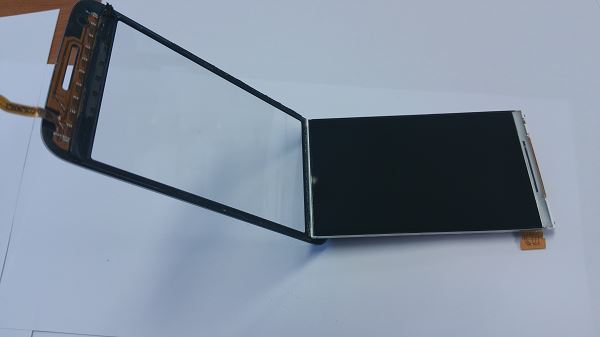
5. Separate the LCD screen from the Touchscreen.
Those of you who have already repaired some smartphones know how some LCD screens are glued to the Touchscreen. There are two kinds of glue; UV glue or conventional glue. Here we are confronted with conventional glue: it is quite possible to separate the two screens, unlike the iPhone 4 and more recent models or the Galaxy S 1 and more recent models.
So we will be able to change separately the LCD screen or the glass depending on which needs to be changed.
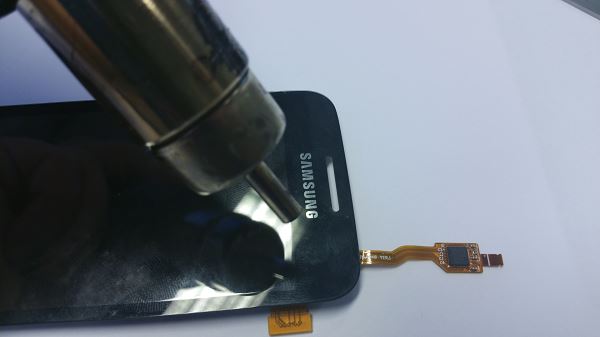
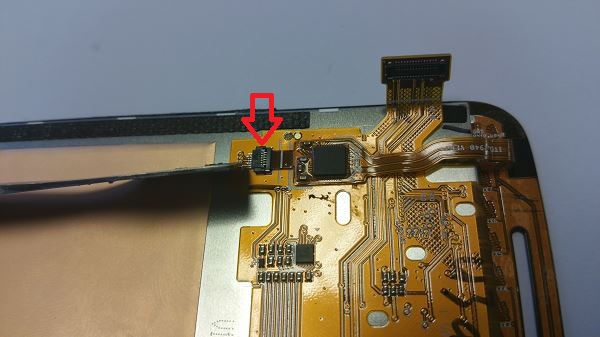
First of all you must disconnect the flex from the Touchscreen of the Galaxy Trend 2 lite from the LCD screen. To do this, flip the display assembly, and then locate the small connector of the glass on the LCD screen. It is black and white.
The flex is held in place by a lock, that is to say a small lever that we will be able to pull up to be able to release the flex.
Here it is in a down (initial) position, the flex is firmly secured.
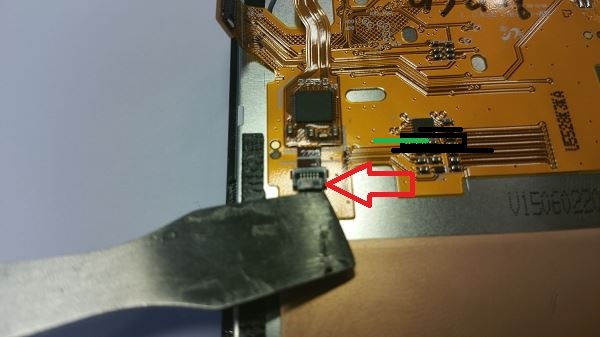
Pull it up with your spatula like this:
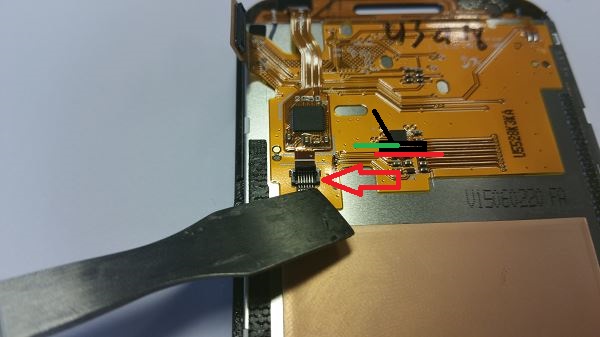
Then you can detach the flex with your spatula as it is very lightly attached to the LCD.
The glass is now no longer connected to the LCD except by a little glue.
Heat along the visible edges of the LCD? There is a 1.5mm strip of glue all around the edge.
With your spatula, remove it but be careful as your spatula may scratch the LCD, so always hold it parallel to the plane of the LCD as shown below.
As earlier it is a good idea to remove it from the top to avoid heating further down This method has the advantage of spreading the pressure all along the length of the screen and not just where you are lifting it; so you can better take advantage of the flexibility of the parts and also minimise the risk of breaking one of the two components.
So now the display assembly has been separated; you can change the glass easily. But be careful with the alignment; this is easily verified by looking at the screen on the LCD side (so not the image side). The extremities of the glass must extend evenly around the edges; that is the parts of the glass which are not hidden by the LCD should show you the uniform black strips. If not, you can remove it and reinsert.
If you change the glass, make sure you replace the flex in the connector and lower the locking lever properly.
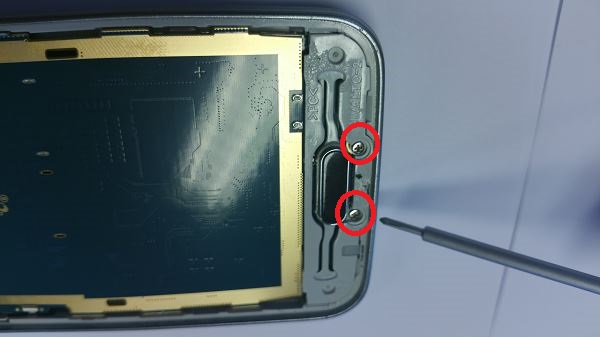
6- Dismantling the Home menu button of the Galaxy Trend 2 lite.
Now let us deal with the home menu button. Its white chassis holds the motherboard in place, so this is the next logical step in disassembly.
The chassis of the home menu of the button Galaxy Trend 2 lite is held in place by two screws; the first two screws we have to unscrew. Trend 2 lite screws are really exceptionally tight (for their size). You will probably have great difficulty unscrewing them; you need to press hard on the screws to undo them. This needs patience. So this is why you need to use a PH0 this time, and nothing else. A larger one (a PH0) brings a considerable risk of slippage and therefore of breaking the screw heads; the same goes for a smaller one. So remember to press like crazy on the screwdriver while turning, even if it means you will need 3 tries for just one turn. This tutorial was made with the Trend Galaxy Lite 2 tool sets, so you can have the right spatula and the right screwdriver if you choose this set.
We believe this tightness is caused by undersized drill holes.
Once the two screws have been removed, with your spatula you can use the two notches made on the sides of the chassis so you can unclip it.

The second notch:
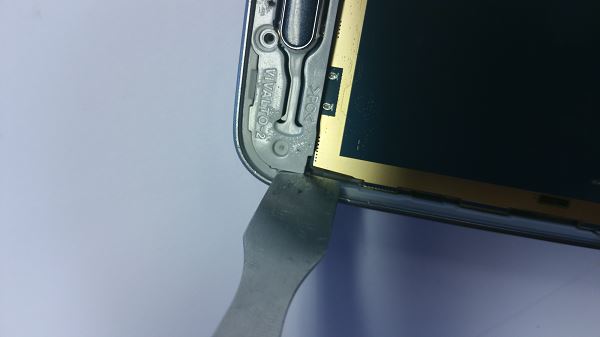
See how the chassis is now disassembled.
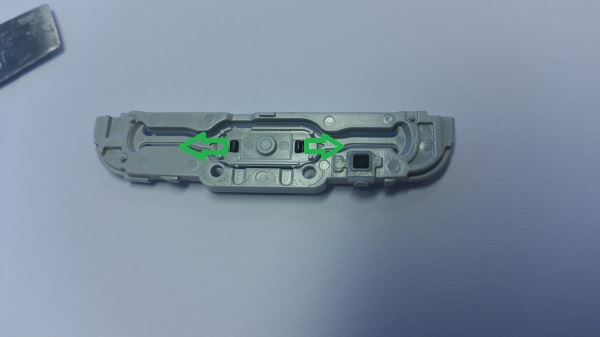
If you have to change the home menu button (not to be confused with the contactor of the home menu button that transmits electrical information), then you will need to push aside the two black tabs to release it.
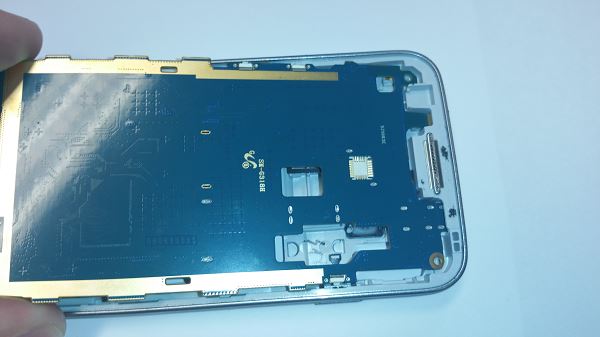
7. Removing the Samsung Galaxy Trend 2 lite motherboard.
We can now tackle the motherboard that contains many of the small vital parts you can change in a phone.
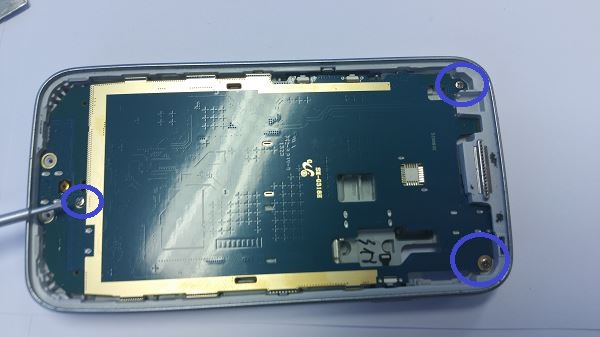
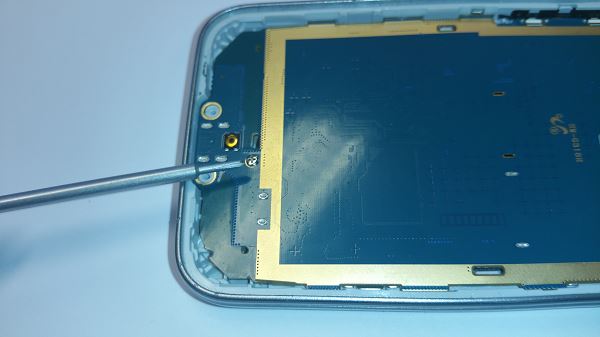
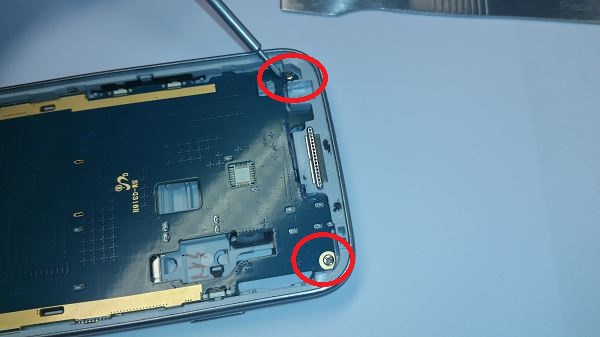
The motherboard is held in place by 3 screws; the top two are identical to the others while the lower one (the one by itself) is of a different size and is separated from the others to avoid confusion when reassembling after having been unscrewed (the order is relatively unimportant).
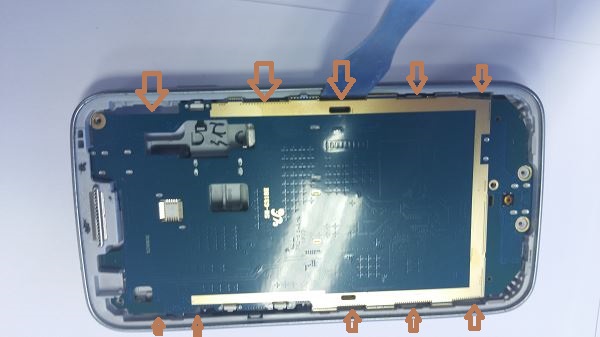
The motherboard is held in place by tabs, some of which we removed during the first stage of dismantling the screen.
With your spatula release them one by one; spaces have been left for this.
While doing so, keep you spatula flat so you leave no trace on the chassis cover, which is important for the appearance of your phone.
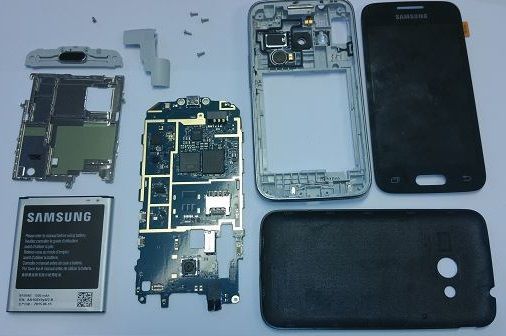
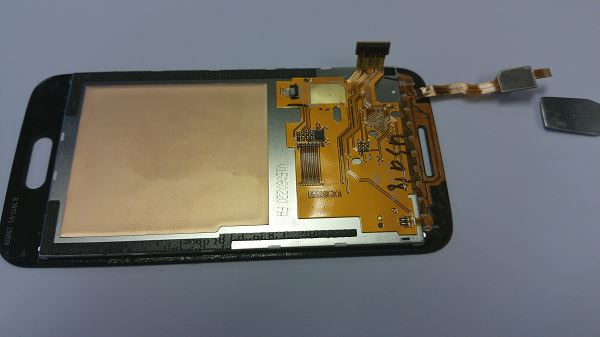
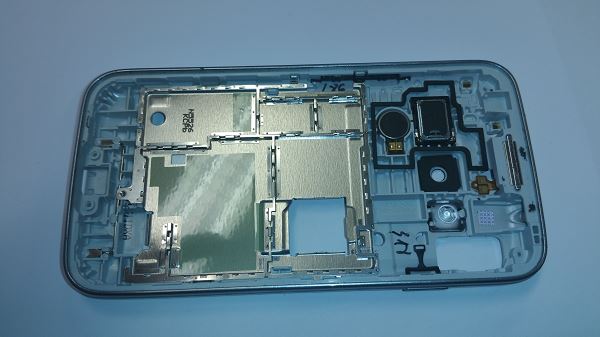
By removing the motherboard, you can see a metal plate which separates it from the battery. This kind of plate is more often used by Sony and Apple.
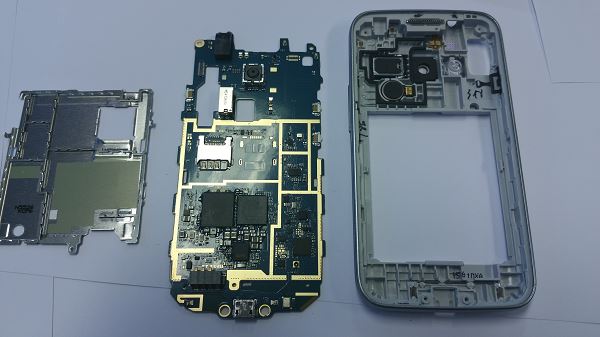
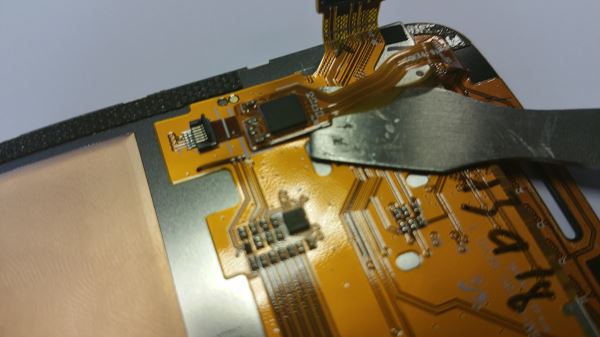
We take this opportunity to get a close up of the chipset in case one of you needs a reference.
If you are good at welding, you can change the SIM card reader, the battery switch or the USB connector circled in green below, from right to left.

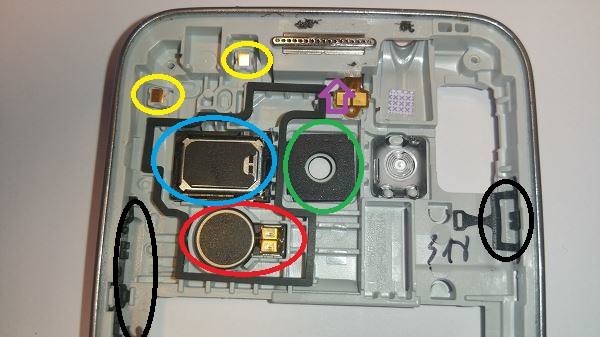
We can see quite a few important parts on the back chassis:
-The antenna contacts in yellow
-The ringer in blue
-The camera cover in glass
-The buzzer in red.
-The earspeaker in pink.
-Volume and power buttons in black.
Now you can change them if you need to.
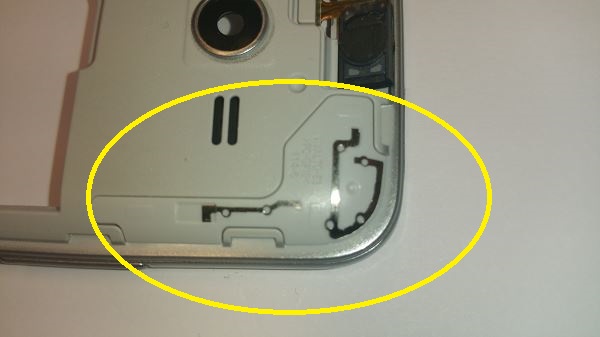
For the record, this is the phone antenna; as you see antenna change, the circuits are now visible (certainly for increased flow rates).
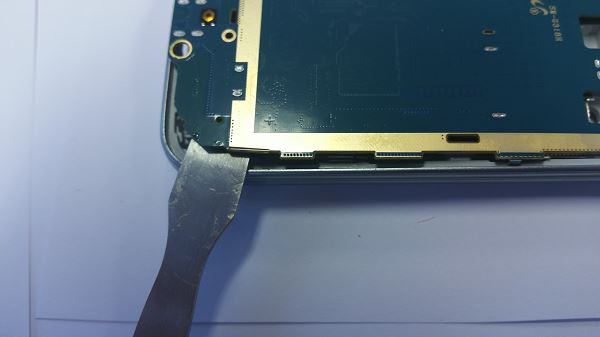
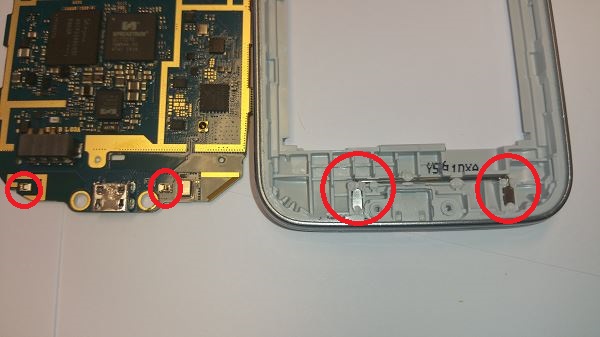
Brief last minute reminder; a power problem or alteration in tracks at the USB connector. You go through a small aluminium bar in the chassis to fix the problem!
8-Reassembling the Samsung Galaxy Trend 2 Lite G318.
We will now reassemble the phone.
Replace the metal plate.
Replace the motherboard from the top of the card, like this.
Replace the smallest Galaxy Trend 2 lite screws.
Then the other two. These are the most troublesome screws, considering how the phone is designed. No need to press hard so it goes right in. If they go too far it will not be a problem (unless it is a phone which cannot be dismantled).
Then replace the chassis of the home button.
Then the Touchscreen and the LCD (which now forms a single assembly). Remember to insert the connector in the space provided.
Flip the screen and connect the connector of the Galaxy Trend 2 lite screen.
The cover must be repositioned in a specific order, like this.
The side of the connector comes inside, so then we can lower it.

We can now replace the battery and SIM and SD cards.
You can then remove the protective film from the glass, which is not intended to stay on during use.
We suggest you immediately put in place a tempered glass protective film that seems to us the best means of protection.
As good as new! Your Samsung Galaxy Trend 2 lite is now as good as new, or even better than new because you have in part contributed to reconstructing it!
See you soon for a new disassembly tutorial for the Samsung Galaxy!
Délais de livraison
Commandez avant 14 h
soyez livré entre 01/08 et le 04/08/24
Délai avec Suivi GRATUIT +infos modes de transport fr
fr


COMMENTAIRES
Aucun commentaire pour le moment.